In Straws We Trussed - Page 2
INTRODUCTION TO THE TRUSS ACTIVITY
Click here to bring up a separate browser window for the truss applet, which is part of the Virtual Laboratory of applets available through Johns Hopkins University. This program allows us to create a model truss structure with supports and loads. The program then determines the reactions and calculates the tension and compression that would result from the shape of the truss and the loads applied.
Trusses are made of long, thin pieces, usually of steel or wood, that are called members. These pieces are connected together in a series of triangles, and the points where the members meet are known as nodes. For a truss, it is also assumed that all of the forces - both loads and reactions - are applied at the nodes.
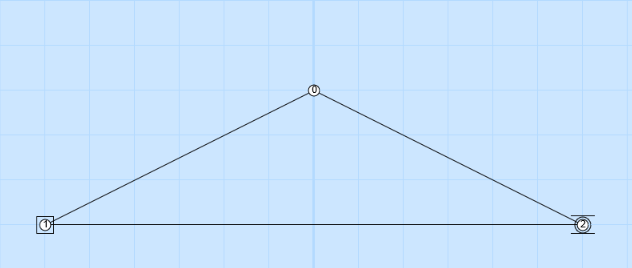
We will begin our exploration by constructing a very simple triangle truss. First select the 'Design' button. Then select the 'Add' button and after that click the 'Node' button, and then place three nodes by clicking the pointer on the grid. Place one node in the bottom left corner, six grid units from the left, and two up from the bottom. Likewise, place a node in the bottom right corner, six units from the right, and two up from the bottom. Add the third node halfway between the two sides of the grid, and one unit down from the top.


Next, add members to these nodes. This process is as simple as "connecting the dots". First, click on "add member", then connect the nodes by clicking on the first node, dragging the pointer to the second node, and releasing the mouse button when near the second node. This should draw a green line representing a member of the truss. Connect the three nodes in a triangle.


Two of the nodes must be chosen as support nodes, representing the parts of the structure that are somehow prevented from moving by outside supports. One of the nodes must be a fixed node, which prevents the structure from moving either vertically (up-and-down) or horizontally (left-and-right). Think of it like a thumb tack that holds the specific node in place. Select the "fixed node" button and then click on the lower left node to make it a fixed node - it will change shape and color.


Thinking in terms of a 'thumbtack' again, note that a piece of paper attached to a board with a single thumbtack can still move, by spinning around the thumbtack! The second support node is necessary to resist this spinning motion (known as rotation). This node can be either a vertical rolling node or a horizontal rolling node. Either one can be used, but in order to prevent rotation, there are some rules about where each kind can be put.
A horizontal rolling node cannot be vertical to (directly above or below) the fixed node.
A vertical rolling node cannot be horizontal with (directly left or right of) the fixed node.
If this simple triangle truss were a bridge, the lower right node would also be a support node. Note however that it is directly to the right of the fixed node and therefore cannot be a vertical rolling node. Select the 'horizontal rolling node' button and then click on the lower right node to change it into a support node.


With the structure of the truss complete and the support in place, the next step is to add loads to the structure. Loads will be placed at the nodes, but in general only on nodes that are NOT support nodes.
For this example, imagine that there is a 100 pound gorilla that climbed to the top of our bridge, and this gorilla decides to hang from the node located at the top node. The weight of the gorilla exerts a force going downwards. Forces are measured in newtons and have direction so that is why the forces shown in the activity have a x and y component.
To add this gorilla's weight to our bridge, we can add a force from the node at the top. Click on "Force", then click on the top node and drag the mouse down until the number shown reaches 100. Make sure the arrow that appears is perfectly vertical! This load will represent the gorilla hanging from the top of our bridge.


Now we have completed the structure of the bridge, along with supports and a load.
| On to Page 3! |